


For a new beekeeper thinking about raising their own bee queens is a flop idea. But as the experience grows then it becomes very obvious that there are numerous benefits of doing so.
• You can build your own bee colony.
• You can sell the queens further and earn good profit.
• You can requeen your own bee colony when necessary.
• You will get disease resistant breeding stock.
• You can control the quality and reduce the risk of introducing pests.
• And it’s fascinating to work in harmony with the nature.
Experienced beekeepers are well aware from the fact that raising their own queen is very rewarding, so let’s discuss the most popular method of producing bee queen for commercial purpose.
The method which we are going to discuss here is commonly known as Grafting and to perform Grafting, beekeeper has to take care of some important points:
• A good queen breeder to graft her larva and make new queens.
• Grafting larva of proper age (12 – 24 hours).
• Queen rearing equipment – grafting tool, cell cups, cell bars and frame, all these things can be purchased from the market and can also be made.
• Queen rearing classes.
Making of Queen Cell Cup
• Use light coloured wax for the making of queen cell cups.
• Use a steel or aluminium stick approx. 10 cm long, whose end is round or sharp (from which wax cup can easily be removed).
• Depth of the cup should be 9-10 mm.
• Wash steel stick in cold soap solution and after taking it out from the solution, jerk out extra soap water from it.
• Don’t melt the wax on direct flame, instead put wax in a bowl and then put the bowl in a water container which is on direct flame.
• After this put the steel stick in the melted wax up-to 9 mm and then take it out to let the hot wax get cool down. Repeat this process 3-4 times.
• To let the wax cool down properly put the steel stick in cold water after dipping it 3-4 times.
• When wax is cooled down, slightly tilt the wax cup at the end and remove it slowly. Wash wax cup properly in clean water.
Fixing Queen Cell Cup on the Frame
This queen cell cups are fixed on a 5 cm thick wooden pallet on a distance of 2.5 cm with the help of extra wax. Place the wooden pallet on both side of the frame by making mold in it. In one frame max three wooden pallets can be placed.
Conditions for Nurse Colony:
The beehive which is used to make the queen bee are also known as cell builder or nurse colony; generally these beehives have no queen. So during the selection of nurse colony keep in mind that its honey production capability is good and that particular beehive is disease free, healthy and is good in population.
Larva Grafting Procedure:
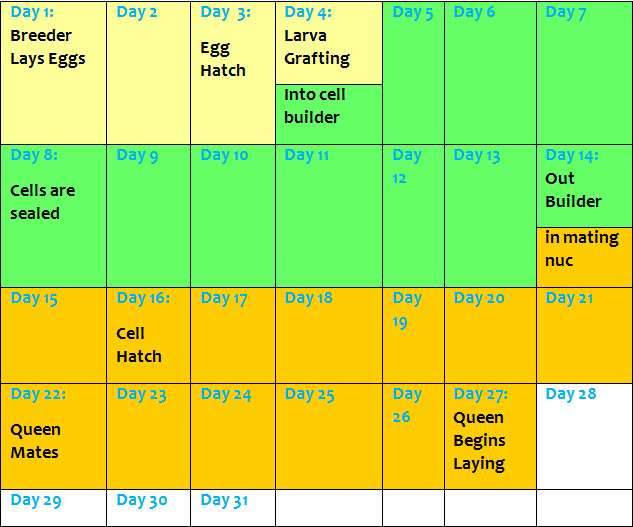
Day 1: Give breeder hive an empty dark brood comb with all the basic facilities to lay eggs.
Day 4: Transferring the larva into artificial queen cell cups with the help of grafting needle at appropriate temperature, in a moist place has high success rate of grafting procedure.
Use the grafting needle and slip it under the larva to lift it out and place it in the bottom of the queen cell cups.
Birth of Virgin Queen:
Day 14: Remove the mature cells from the nurse colony and leave one cell behind to replace the queen. Try to keep the queen cell warm up to 80 to 94 ° F until they are placed in queen less colony.
Day 22: Now virgin queens are ready for the mating procedure. Mating should be done in a nice weather with temperature of about 69 ° F and good number of drones for mating.
Try to time your activities for better results, then you will definitely achieve success.
Practice, Training, Good light and Steady Hands is necessary to perform grafting procedure. Unfortunately many beekeepers avoid doing it due to less precision rate. But with an hour or two of practice, any newbie can acquire this skill easily.
So give it a try!
For more information about Agriculture and Livestock, download Apni Kheti app – Android, iPhone